Have you ever felt uncomfortable when seeing an old and outdated popcorn ceiling in your home? If yes, you were the same as mine one year ago. I felt sick each time looking around at my house and decided to renew it.
Still, you should not rush to start removing the popcorn ceiling right away. Many mistakes might occur during the process, and you possibly have to fix them again and again.
So, if you intend to make a new look for your house, let’s read this article to know exactly “what to do after removing popcorn ceiling?” for better preparation!
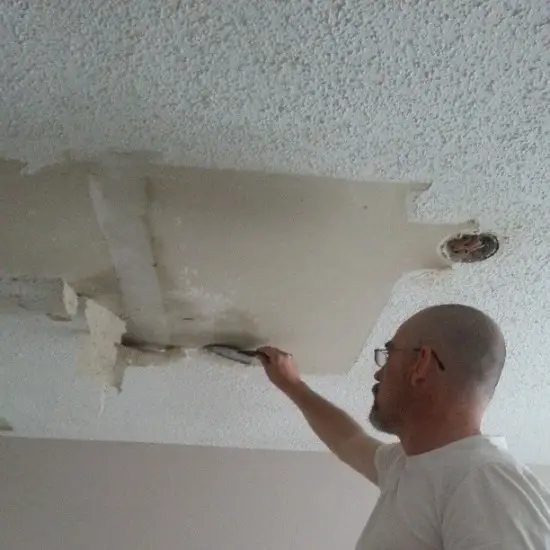
Table of Contents
Should I Texture The Ceiling?
There is no certain answer to this question, as it all depends on your preference to texturize the ceiling or not. Read on for my explanations and see if those facts can help you make a suitable choice!
In fact, texturizing also has its disadvantages. Old ceilings may have asbestos which causes many detrimental health effects in the long term.
But from my experience, I found the texture of the ceiling retro and beneficial. The main reason behind it is that the texture ceilings can reduce the noise from room to room and mask imperfection.
Also, it would be the best way to go if you have a small budget and plan to work by yourself. Texturing the ceiling is also suitable for those who want to make the room look cozier.
What To Do After Removing Popcorn Ceiling?
If you do not want to texturize the ceiling, trying a modern smooth ceiling to replace the old one is not a bad idea at all!
After setting your goal, what to do after removing popcorn ceiling to obtain the desired result? What are the steps? Let me give you a hand with my several year’s DIY home experiences!
Wait For At Least One Day
It will be a good idea to give your ceiling time to rest after the popcorn removal. Breaking at least one day gives space for the ceiling and its surroundings to dry properly.
Check and Repair the Damage
After a 24 hours period has passed, you can start repairing the ceiling. Do not be surprised if you discover a slew of hidden flaws and imperfections after removing it! Besides, make sure to utilize your drywall taping knife to patch in the holes with the drywall compound.
Now, let’s smooth it out!
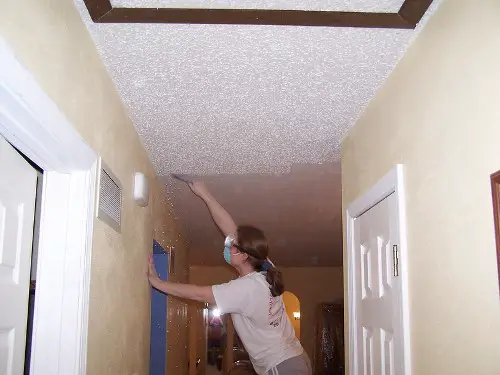
Sanding
Allow at least 4 hours for your ceiling to dry after repairing the damages with the drywall compound. Subsequently, it is time for you to sand. Remember that sanding stronger can smoothen the area of the ceiling.
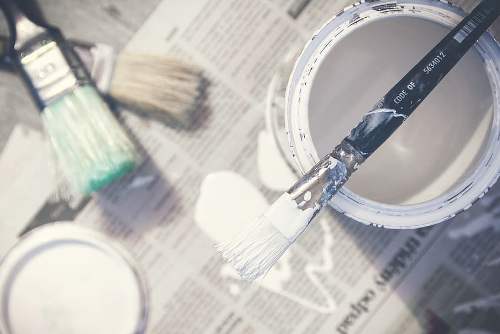
Painting
Personally, using a roller with an extended attachment to paint is the best way for your ceilings. As you may know, ceiling paint is designed to roll smoothly with minimal splatter and will not turn yellow over time.
There are various color options in the market; it all depends on your interests and the house style. Specifically, the color you opt for will play an essential role in deciding how your new house looks, so remember to consider it carefully before jumping to paint the ceiling.
Moreover, you should not choose dark colors, especially when it comes to small rooms. Dark tone color will make your room look gloomy or suffocated sometimes. For me, white is the best color to make the house lighter and more enjoyable.
Even though this method can create a modern look for your house, it cannot cut down the noise and is more costly than texturing the ceiling. Therefore, please consider each method’s pros and cons carefully to prevent regret in the future!
But believe me, your house will still have a better look regardless of the options. It’s all about different personal tastes and demands!
Frequently Asked Questions
Is It True That Eliminating The Popcorn Ceiling Will Raise The Value Of My Home?
Definitely yes, removing the popcorn ceiling can raise the value of your house as it does not handle moisture well, which will negatively affect your house. Moreover, when you want to sell your house, buyers still prefer the new and modern style instead of having a popcorn ceiling.
How Do I Refinish A Ceiling After Eliminating Popcorn?
After removing the popcorn, you may easily texture your ceiling with a paint roller. To accomplish this, simply get some texture mix, dip your paint roller in it, and start rolling it on the ceiling like the way you paint on it.
After Eliminating The Popcorn Ceiling, Do I Need To Skim The Coat?
YES. You can use a 4-inch utility knife/ a drywall knife to chip away at the texture and create a smooth surface when scraping popcorn ceilings. You will probably have to smooth out any irregularities with a small layer of joint compound, after which sand it flat before repainting.
Is It Necessary To Prime After Removing The Popcorn Ceiling?
Right after your popcorn is eliminated, you need to sand it with bad seams, and dents carefully finished off. After completing the sanding and topping off the ceiling steps, it’s a good idea to prime it before applying texture.
Noticeably, non-primed drywall may absorb the paint’s moisture content, causing uneven texture distribution.
Conclusion
Repairing the house by yourself is never easy, but it is still possible to carry it out in the right way. If texturizing the ceiling is not your choice, a smooth ceiling will bring your house a new modern look!
As mentioned above, you need to apply four steps after popcorn removal, including letting it dry, repairing the damages, sanding, and painting.
With the article on “what to do after removing popcorn ceiling?,” I hope you can quickly fix your house successfully, making the house more elegant and modern!
Related Post:
- How To Stop Concrete Floor Sweating Under Carpet?
- Pros And Cons Of Fiber Mesh Concrete: Is It the Future of Building?
- How To Strengthen Floor Joists From Beneath
- How Difficult Is It To Replace Floor Joists? Should You DIY Or Hire A Pro?